NOTE: This tutorial is outdated and is not relevant anymore.
It’s time to tell about the way we organizing usage of the same models in various scenes with blender.
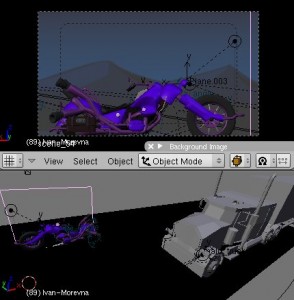
Imagine we have a model of… mmm… bike! And as you could see from storyboard bike is appearing on many scenes of Morevna Project demo. We do not want to include the full copy of a bike because every time we will change the original model, we will need to re-insert it into each scene and (sic!) animate it again.
Consider, what it is unavoidable to make changes in the model after it already inserted in the scenes and process of animation already begun. We can’t design the model from start till the very end – there is always something to fix during the usage. Also it could be handy to insert unfinished yet model to the scene to see how it will look, and let one artist to work on the scene and other continue develop model (like we did for truck model in scene 54).
In other words we want each scene where model is used to update automatically when the file with model updated. That implies:
- Applying all modifications done in the original model file to the model in the scene (including newly created objects);
- Keeping animation applied to the model in current scene.
That’s why we are using blender’s feature to link data from one file to another.
We just briefly describe process of linking in blender 2.46, paying attention to some tricks and unobvious moments.
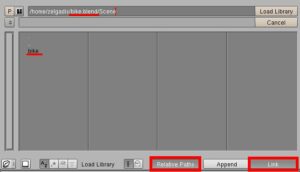
Ok, if we want to link some model into the current scene we just go “File > Append or Link” menu. In the appeared dialog enable the “Link” button instead of “Append”. To keep our files transferable, we are also enbling the “Relative paths” button, but in this case current blender file should be saved first.
Next, search and click on the file with a model, then choose what you would like to import. We are choosing the “Scene”, cause we want to import the whole scene containing object. Then choose the scene name you would like to import. For Morevna Project we are always naming the scene containing model as the .blend file named, i.e. in file “bike.blend” we will choose scene called “bike”.
After you click “Load library”, a scene called “bike” will appear in current file. A linked scene. But you can not move or edit linked data from current file.
The problem is solved with the help of Proxy objects. Just select the linked object in the scene and press Crl+Alt+P. Huh? No luck? OK, as I mentioned above, the linked data could not be edited. When we pressing Crl+Alt+P it issues he creation of the proxy object in the current scene. But our current scene now is linked one! So it couldn’t be edited and the proxy isn’t created.
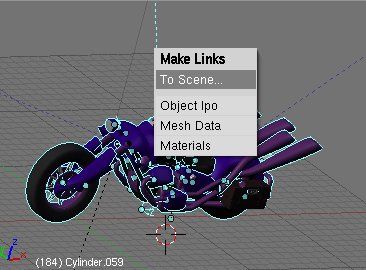
So, all we have to do is to create a new scene where our action take place, link objects there and after that create proxies in that scene. C’mon, create a scene and name it… let’s say “54”. We are always naming them as a number, representing corresponding scene number in storyboard. Then return to the scene “bike” select all objects (A) and link them (Ctrl+L > “To Scene…”) to the scene we just created – “54”.
Now, just go to the newly created scene, you will see the bike there. Select object, you wish to modify and press Crl+Alt+P. Now it could be moved and animated.
But here’s comes another issue. Creation of a proxy means creation of the object, which comes as agent between current scene and linked data. That means all modifiers for current object what applied in the original file (like Subsurf and Mirror) will be lost after creation of proxy for it. Also, all materials linked to the object (not to the mesh) will be lost.
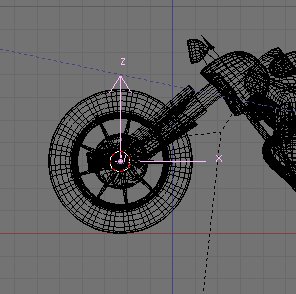
For example, if we want turn a wheel of a bike, we will create a proxy and will be able to turn it, but we will loose Subsurf modifier. Of course, we could apply it again to the proxy in current file, but that’s no good, cause if we modify Subsurf’s parameters in original file, it won’t be reflected in our scenes.
We could suggest a little workaround to fix that. But before that we should get rid of the wheel proxy. Just delete wheel object from scene “54”. It’s okay, cause we could link (CTRL+L) it again from scene “bike”. If we not delete proxy object, when we will link wheel again from “bike” scene to “54”, the proxy will continue it’s existence and will keep performed transformation. It’s a good behaviour, but not what we want now – we just want to get rid of the proxy. Another way is just Undo (CTRL+Z) if you have enough undo steps available.
Ok, let’s proceed. In the original file, containing model (bike.blend) we are creating an Empty (SPACE > Add > Empty) and parenting (CTRL+P) the wheel to it.
After that, when we reopen the scene, containing linked bike, the empty will appear there on a scene bike. Cause we added a new object, it is not appears on the main action scene though. So we need to go to the bike scene, and again: select all (A), Link (Ctrl+L) > “To scene…” > “54”. The scene will be updated.
Now we can go to the scenne “54”, select the Empty and make a proxy for it. Nothing wil be lost – no modifiers or materials appled to the Empty, but the wheel object will follow the Empty object transformations, cause it’s parenting to it in the model file.
That’s all tricks about reusing models workflow.
If you updated the model, the changes will be reflected automatically after reloading the scene, where this model was used. As I mentioned above, if new objects were added to the model, you need to make additional steps – go to the linked scene, select all, and CTRL+L to scene where the action takes place. New objects will be linked together with old ones, but the proxies position and animation will be kept. That’s just what we need.
One last thing: watch your linked files! If you open scene file having one of the linked files unavailable, the blender displays a “WARNING IN CONSOLE” message and all data from unavailable linked scenes will disappear. If you’ll save file after that, the lost linked data couldn’t be recovered even after you’ll return linked files in place. Keep that in mind.
Good luck!





8 Responses
Thanks a lot. Will have to give this setup a try.
How is it best to export an object to a .obj file, btw? (not needed for this example, I realize) Export> to what?
Also, in the last paragraph you mentioned something to watch out for. From what you described, does this mean that if I try to open my linked scene file (the one that is linking to the original scene from a different file,) and the original file is not available, all the linked information in the file linking to the external scene would be lost, and if I saved, I would not be able to regain the animating I had done, even if I restore the original files to their correct locations? Thanks for the update. Something to watch out for.
Benjamin Bailey
http://minosafilms.wordpress.com/
P.S. Did you write this post to answer my question about the proxies? If so, thanks a lot! Great help. God bless…
Hi,
Good luck with the project! I’ve added your feed to http://www.planetblender.org
On another note: I’m working (on and off) on DbBlender – a way to have .blend data in a database, with an integrated workflow for Blender to transparently interface with the database.
The idea is to allow for data organisation and management. If you have any ideas on it, please consider writing me some mail with ideas on how you would see such a toolset work for you.
/Nathan
Benjamin:
I’m not sure about .obj, but suppose you could try “Export > Wavefront (.obj)” menu item. 😉 About the last paragraph: you got the idea right. And, yes, your question was an incitement for me to write this article. Don’t hesitate to ask more. ^_^
Nathan:
Thank you! Definitely not all posts are dedicated to blender, but maybe blender community will find something useful here.
Good looking project!
by the way, what’s the advantage of linking the whole scene instead of just a group containing the bike?
I read through this method you use and it looks like a huge amount of work, coming back and forth from scene to scene, linking deleting and linking again, while using a group would be just linking once and do proxy of the armature, but maybe i’m missing something, linking the whole scene could have benefits too.
keep it up! will be following, cheers!
Thank you!
Hm… groups? If we link the group from external file, then “Add -> Group -> bike”, then we will recieve a empty with the all bike objects “attached” to it via DupliGroup.
But how could we change the animation of the bike? I mean, on some scene we need bike staying still (wheels not rotation), in other bike is moving (wheels are rotated and handle-bars too). I really don’t know how to achieve this with groups.
Described method is not that complex. Notice, there is no need to delete existing objects – we just need re- CTRL+L all objects from linked scene. (In described example we had to remove existing objects just because we wanted to get rid of the proxy).
In short:
1. If linked file (bike) was updated, but no new objects were added, we don’t need to do anything to have scene 54 up to date.
2. If linked file (bike) was updated and there are new objects were added, we in file containing scene 54 we must go to linked scene ‘bike’, select all, and CTRL+L to scene 54. Now we are up to date.
Maybe there is an easier way to keep objects from file A automatically appear in file B?
Hi ,
as Pablo says,
after you added your linked group , you can do ctrl+alt+p on the dupligroup,
then you will have a menu that let you select objet to be proxy-ed .
the best is to use it on armature or in emptys that move objects inside your group.
it’s a nice project you have, use full power !
Wow, it works! Thanks alot! I never thought about trying CTRL+ALT+P on dupligroup. ^_^
We need some time to investigate this method a bit more, but if everything will be ok, it will really simplify things!
OK, looks like approach with groups is not suitable for us.
For example, the bike have a bone (1) which acts as a driver – when it’s moved, wheels are turning and bike body is shaking. Bike shaking is defined by the empty (2) which is driven by the bone (1). Bike linked as group, armature with driver bone (1) is proxied.
https://morevnaproject.org/wp-content/uploads/2008/08/bike-groups.png
But if I want put someone on the bike while it’s riding, then I need parent it to the empty (2) which is shaking the bike. I can’t parent anything to that empty, because it’s part of the group. I can’t make it proxy, because then all IPO-driver information and transformations immediately lost.
Conclusion: Approach with groups is great, but not for the cases when drivers are used. It’s sad, but we should stick with a bit more tedious approach described in this post.
Anyway, thank you a lot for the info, I have learned a lot! ^_^